|
2020 Update: Exterior Repairs (Regular Maintenance)
Every structure has maintenance requirements. Repairs aren't very exciting to anyone but the person needing them done; but they need to be done if you want your home to retain it's value.
A good rule of thumb is to set aside (save up) at least 1% (1/100) of your home's value every year for home maintenance. As an example: for a $360,000 house, set aside $300/month or $3,600 per year.
Part of the decision process in the Green Building Project includes reducing the amount of maintenance needed or, if that is not possible, expanding the amount of time between maintenance expenditures.
- The TPO roof should need no maintenance beyond pressure washing (to remove lichen and dirt) and the frequency of that is determined by when the effectiveness of the Energy Star(R) Grey color is lost because it no longer reflects the rays from the sun. (This is not to say that severe weather could not cause damage, but that is not part of regular maintenance.)
- Likewise, the Azec fascia boards that were replaced at the same time the roof was don't rot because they are made from PVC and are unlikely to need replacing. However, they are not unaffected by weather and time (faded paint, wind causing vibrations that either pull nails out or cause the material to break, etc.). Fascia and soffit boards that were NOT replaced with the roof are affected by rot and weather and time.
- The fiber cement siding also should need no maintenance beyond pressure washing for algae and painting (which is why we chose Sherwin Williams Duration paint: it carries a 20-year guarantee).
- We did not cover the composite siding under either of the porches with fiber cement because the areas are small and highly protected from weather. Which is not to say they do not get rained on when we get storms that blow rain sideways. Therefore, these areas require special attention when it comes to paint and our choice of Sherwin Williams Duration paint with the 20 year guarantee was especially important.
- The way the house is designed creates very little run-off from the roof on the outside of the east and west gables and so we have not needed gutters there. However, that means the inside of those east and west gables sends water onto the center roof where it is split to the north over the north porch and to the south over the south porch. Gutters are definitely needed on the porches to minimize the damage from excessive water on the steps of the north side and the deck of the south. (A separate page has been set up for the gutter installation.)
- The decking of each porch is moderately well protected under their respective roofs, but both need to be treated regularly to minimize rot. And when rot does occur, those affected boards need to be replaced.
- Any other exposed wood (railings, ceilings and such) need to be protected as well to reduce rot and keep insects from moving in. (All the painting maintenance is included on the Siding and Painting page, 2020 update.)
Major Life Change in 2019 and the 2020 Pandemic Complicate Things
We had hoped to get the needed maintenance done on the house in 2019 but the hubby suddenly found himself becoming self-employed. Not to worry, we weathered it fine and it turned out to be the best possible thing to happen and at EXACTLY the right time because by the time the Pandemic hit in March 2020 we had a year of experience with him working from a home office all set up for video conferencing etc.
The change did, however, push back our plans regarding the house maintenance repairs and we were finally ready to hire contractors at a time when we weren't sure anyone would be able to work on the house due to the Pandemic.
Luckily for us, all of our repairs at this time were external and need only a few people on a crew at any given time. Each crew understood that we require social distancing and masks to be worn when in our proximity (both because we are 60-ish and the farm is considered an essential business so we have to keep ourselves and our customers safe).
It turned out that lots of people decided to have their homes worked on during this time and all of the contractors I wanted to work with had their crews working. Since I was not under a time crunch, it was not a problem to schedule them over the summer and into the fall.
I started with the roof...
Roof Cleaned and Fascia/Soffits Repaired (Sep 2020)
By 2020 the roof was definitely ready to be cleaned. It was rather ironic that the effectiveness of the very light-colored roof was being reduced by a living thing: lichen. What is lichen?
"A lichen is a composite organism that arises from algae or cyanobacteria living among filaments of multiple fungi species in a mutualistic relationship. Lichens have different properties from those of its component organisms." Wikipedia
Why ironic? Because I have always wanted to have a "living" roof (which traditionally is made up of plants growing in a shallow substrate of soil, gravel, etc.) and here I had a volunteer organism growing on my roof that I needed to remove so that the roof would not become a heat sink.
I was nervous about having the roof cleaned and so I contacted Jerry from Kansas City Roofing Services, LLC to see if he had a crew that would do it. I really didn't want to void the warranty of the roof and I also wanted someone who understood just how SLIPPERY that roof is when it has any amount of moisture on it.
I also wanted Jerry's crew because they had installed the Azec fascia boards and are familiar with that product. So I was thrilled when Jerry came out to give me an estimate and told me that he would send his crew out between commercial jobs to do the cleaning and repairs. That meant the timeframe was all dependent on when he had a couple of people free and it would help him keep those people busy when they would otherwise not be able to work. Since I was willing to be flexible about this, he gave me an estimate that would basically cover the cost of materials and labor (translation: very little mark up for him and big savings for me).
When the time arrived, Jerry and I toured the exterior with the two-man crew and everything was pointed out with instruction about how it was to be done. Before he left, Jerry also instructed the guys to do whatever additional repairs I asked them to do. Nice. This turned out to be very helpful, because the patio french doors had been delivered and the handyman I had planned to have do the installation became unavailable. The guys helped us pull the old door out and slide the new door into it's place (we took over the rest of that installation... it is a separate project).
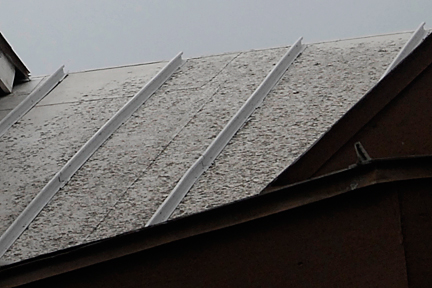 |
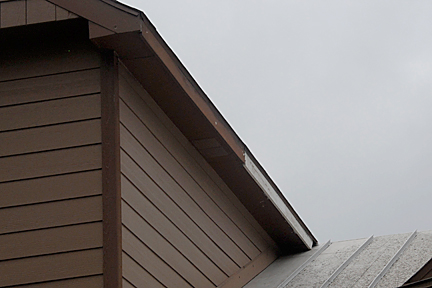
It was difficult to get pictures of the roof without being up at roof level.
These two (2) images are a fair representation of what the lichen growth on the roof looked like.
The top image is the north side of the center roof. The peak runs east to west. That means this side of the roof is NOT in direct sunlight most of the time. It turns out lichen LIKES shade.
The lower image is the south side of the center roof. There is a peak going north to south just behind the chimney to divert water away from the chimney. You can see how much less lichen there is because it gets full sunshine except for when the chimney's shadow is across it.
The east gable (the 2nd story side, peak runs north to south) had minimal lichen because it is rarely in shade.
The west gable (the ground floor side, peak runs north to south) had minimal lichen on the east side and a great deal of lichen on the west side because there are trees to the west of the house that shade it most of the day. |
 |
 |
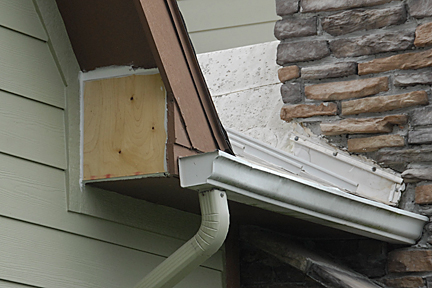
These two image show the roof AFTER it had been cleaned.
The guys had harnesses and a ladder that hooked over the peak so they always had a secure place from which to work. One basically worked the pressure washer while the other weighted the ladder as a counter balance type of thing.
They were so quick, I never seemed to get out there in time to take pictures of them in the process. And when I did see them, I was so fascinated that I forgot to go get the camera.
The images also show the new fascia board along the roof of the porch. I decided not to show you what it looked like before... actually, I decided not to show you ANY "before" shots of the spots that needed repair.
All the rest of the images are AFTER pics..
There are even better pics of the clean roof on the 2020 Painting page. |
 |
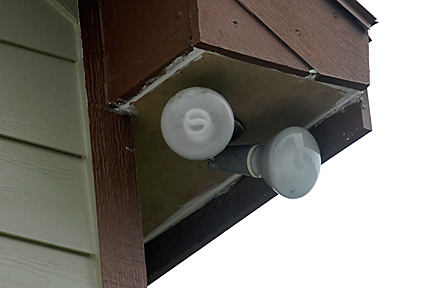 |
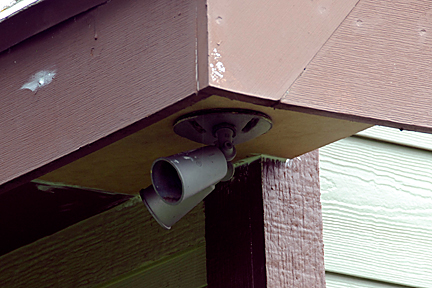
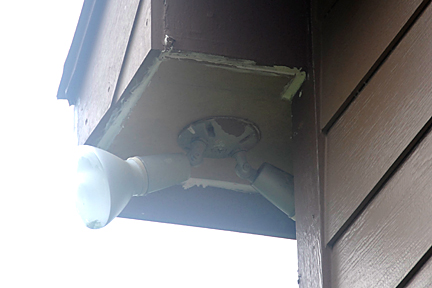
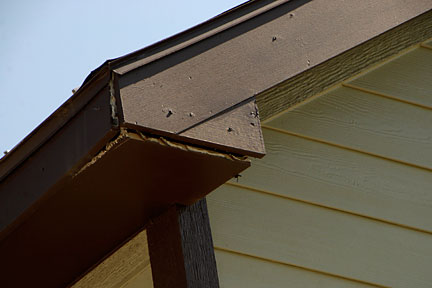
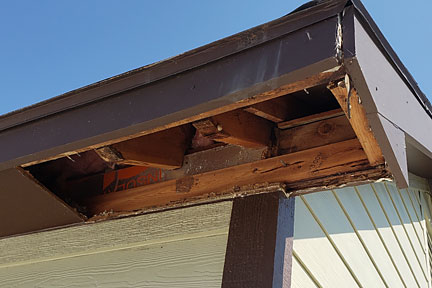
These three (3) image show the floodlights on the corners.
I suppose these areas rotted out because the fascia boards don't extend below the soffit on all sides. Because they are even on at least one side, the water can follow along the bottom of the fascia directly into the soffit.
You can see the difference of the fascia boards on the top image. I'm sure the reason the original fascia boards are not deeper has to do with not blocking the lights. Not the best design... something we will have to keep an eye on.
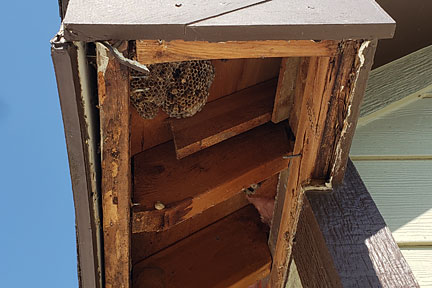
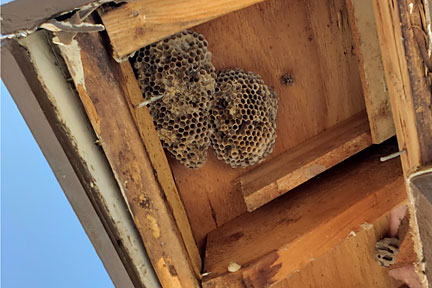
Also, because these corners had rotted, various types of wasps had made their homes inside the soffits.
Thankfully, the hubby is a beekeeper and we have several beekeeper jackets/veils that the crew used to spray the areas before they went about their repairs.
We don't like to kill things here, but there is a time and place to do so and we needed to make sure that no humans were stung during these repairs. |
 |
 |
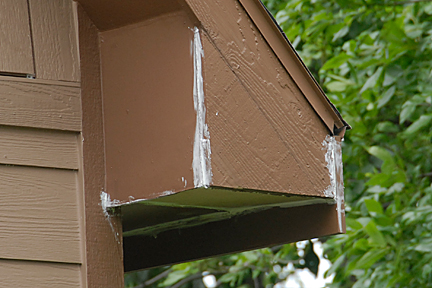 |
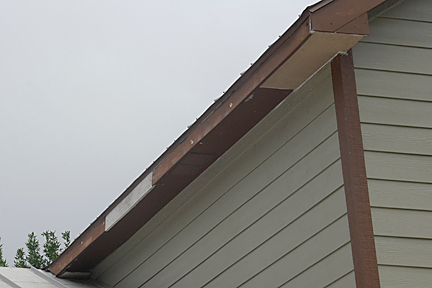
Same issue on the corners of the top two (2) images even though they don't have floodlights.
On the middle and lower images you can see the fascia boards that came loose/broke from wind vibration. These are both on the west side of the 2nd story.
Strangely enough, the corner on the lower image did not have any repair needed even though it is configured the same as the rest of the corners. |
 |
 |
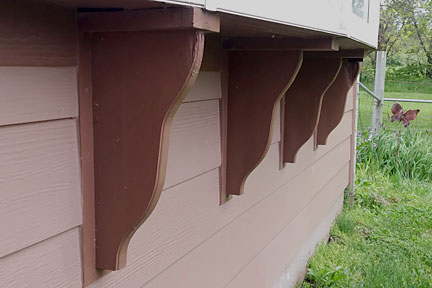 |
And finally, the decorative corbels under the bow window. The top image is BEFORE and the bottome image is AFTER.
Forest (the senior crew member) did a fantastic job recreating the two outer corbels that had rotted because the original owner had not set them back from the edge of the window; meaning water constantly ran down the window and onto the corbels.
As I look at the images, it's not as obvious as I would like it to be, but basically the replacements are about 1.5 inches shorter depth-wise so they are sheltered from the edge.
You are looking for the shape against the wall edge where it attaches to the backing board. The center ones stick out more at the bottom of each corbel. The new outer ones are therefore set back at the top. |
 |
|
|
|
| |
Window Repair (Aug 2021)
Have you ever had an issue in your house that you know needs to be dealt with but there are just so many other more important things that you leave that one thing for later and get annoyed every time you see it? Well, unfortunately, there are SEVERAL of those things in my house and we are FINALLY able to get started on them; the first one being the replacement of a double-paned window in our "bow window" that had condensation between the panes.
There are many repairs we can make ourselves, but this window repair was not one of them. So I looked for a professional glazier in the area and was pleasantly surpised to find one! Robie Elliott of Elliott Glass LLC returned my call in a timely fashion and was able to come out to check on what we needed and give us an estimate (which was provided in writing, nice). He also was fine wearing a mask while either inside or outside our house. In addition to replacing the bad window, I asked him to also replace the mechanisms that operate the two (2) openable windows in that bow window. Only one had a stripped mechanism, but in case the entire unit had to be replaced, might as well do both to make sure they match.
The window pane was available very quickly but the handle mechanisms were back ordered, so it was a few weeks before Robie came out to make the repairs. (This was not a problem for us.)
Before he could remove the window pane, he had to remove the interior "stops" which look like trim to me but is obviously more important than decoration. He was very careful to remove the wood stops without damaging them so he could reuse them. One section -- at the bottom of the bad window -- was water damaged and came away in pieces regardless of the care he took. Heavy sigh - it's always something. He was very careful with the pieces and we decided that with my wood glue and some paint, the pieces could be switched with and used at the TOP of the new window. |
 |
I'm out of practice and forgot to have my camera at hand when Robie arrived, so you aren't being subjected to a bunch of boring pictures this time. LOL
In this photo, you see Robie has finished removing the interior stops and has moved on to cutting the seal around the window pane on the outside. It turns out (and I did not know this) that the exterior side of this bow window is vinyl and a solid construction. So the panes themselves are installed from the interior side with a sealant between the pane and the exterior vinyl.
You can also see just how bad the condensation is in this window pane. |
 |
The dark circle isn't to protect his identity but is the suction cup device used to manuever the window pane.
You might need to look closely to see Robie's hand partially on the inside of that window pane.
Once the seal was broken he used the suction cup device and his hand to push it inside and then angle the pane so he could remove it from the opening through to the outside. |
 |
In the process of removing the pane, he was able to determine WHY there was condensation and water damage to the interior bottom stop. Not only had the wrong type of sealant been used but the old pane had been a wrong-size replacement! There was a 1/4 to 1/2 inch gap on the left side (as seen from the inside).
I was not surprised. This was the window pane that had condensation in it when we were buying the house and the previous owner had to have it repaired as part of the purchase deal. He obviously used a cheap pane and didn't care that it wasn't the correct size held in place with the wrong sealant. Ugh.
After removing the old pane, Robie was meticulous in cleaning the entire opening and all the pieces that he would be putting back in with the new pane.
He has this great little portable shop-vac that I was lusting over, LOL. (You can see it in the photo at left by his feet.)
Then it was a matter of removing the sticker (as you see at left), applying the sealant to the outside edge of the new pane and maneuvering it into the opening before replacing the inside stops.
I was impressed that he simply cut off the nails in the stops so he could nail them without trying to fit the old nails into their former holes. (Yes, little things do impress me. LOL)
He was also successful in shifting the undamaged top stop to the bottom and the damaged bottom stop to the top. All I had to do was add a little wood glue filler several days later. Once I paint it, I won't even notice it.
After he finished inside, he went outside and cleaned off the excess sealant. Then he cleaned both sides of the window so well that I had to clean the other windows to feel less ashamed of myself for letting them become so dirty, LOL. |
 |
The mechanisms were pretty straight-forward and he was able to replace the moving parts without having to replace the interior covers (which means he didn't have to pull out the stops on either of the moving windows).
The window on the right end had always been really difficult to open (probably the reason the mechanism got stripped) and Robie spent some time getting that window adjusted so that it opened smoothly (not part of the estimate, but he didn't charge us more -- very nice).
The photo at left shows the finished window. It is so nice to not be distracted by the window when I'm trying to see the view.
Be forewarned, the cost to repair that window with mechanisms was in the $500 range. Worth every penny. |
|
|
Driveway Gravel, Drainage (2016) and Grading (Jan 2023)
In 2016 we had a deluge of rain to the tune of 15-inches in just a couple of hours. It was devastating for many people/farms, but for us, it was less so because our land is left to deal with such things naturally; except, that is, for the driveway and other man-made structures.
The house is built up on the peak of the ridge and the water from the roof is directed away by the slope of the land or by the gutter on the south side. The garage, on the other hand, floods because it was situated poorly. One of the projects planned SOON is french drains for the garage to stop that problem. But I am getting off-track.
The only real damage we encountered because of that 15-inch rainfall was gouging of the gravel driveway both on our land and along where it meets the road because the culvert under the driveway was 1) not able to accommodate that amount of water in that short period, and 2) the ditches along the road were not able to accommodate that amount of water in that short period so the water made a river/ravine out of the road and gouged HUGE ruts as it carried the layers of gravel to lower ground.
The hubby used a wheelbarrow to load some of that washed gravel out of the ditch and repair that part of the driveway that meetsthe road directly in front of our driveway. It took a while for the County to send out a road crew, but they did eventually make repairs to the road.
The hubby also decided to put in a drainage tube along the west side of the driveway to help stop the rain water that was not soaking into the pasture on that side from washing directly onto the driveway (and washing away the gravel that we knew we needed to add to replace what had washed away). I don't have photos of that process, but I can easily describe what he did.
First he dug a shallow (about 12 inches) trench along the driveway from the culvert that goes under it by the crab apple tree down to the entrance to the culvert at the road (about 50 feet). He then put the 50 feet of drainage tubing into the trench covering it with a small amount of pea gravel (which we had on hand from another project) before replacing the dirt and grass on top creating a small berm along the side of the driveway and thereby creating a swale where the tubing is.
The result being that (hopefully) whatever water not soaking in would run to the culvert at the crab apple tree and from there into the rain-garden pond on the east side of the driveway OR into the swale/drainage tub down to the culvert under the driveway at the road and into the ditch. And to date (January 2023) that is exactly what has happened.
Once that was done, we ordered 1/2" gravel for the driveway. I'm not sure how much we ordered, but there was definitely more than we ended up needing. |
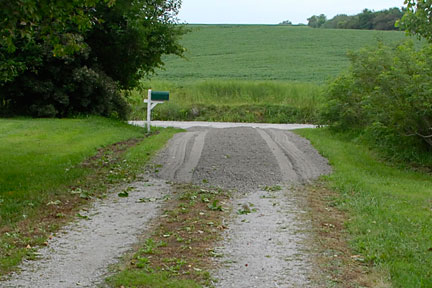 |
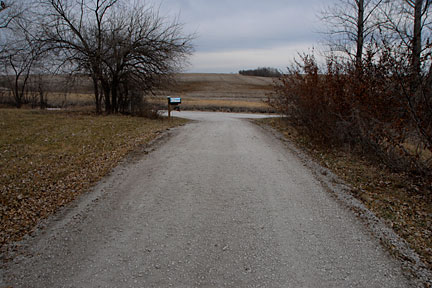
The image at left shows the delivered gravel the way the dump truck was used to distribute it.
I'm not sure if you can see it, but there was more gravel distributed on this side of the mailbox creating a 'bump' on the road and therefore a steeper pitch to the drive coming directly off the road. It's not more than a couple of inches difference, but it ended up being just enough that when we have snow, none of our cars can make the turn and climb that new angle.
You can also see at the left side of the gravel driveway where the disturbed soil/grass is indicating the location of the drainage tube.
|
 |
The hubby is walking along where the drainage tube goes to the culvert at the road.
I'm not sure why the gravel we got is gray and the road gravel is white. I suppose that it is different stone and you have to know to specify white as opposed to gray gravel. It didn't really matter to us... well, not TOO much. |
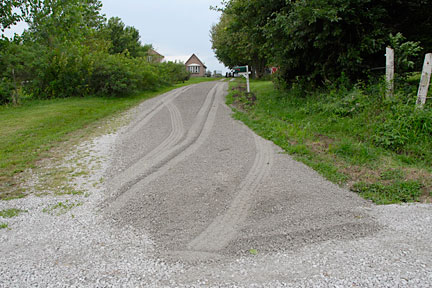 |
This is a better image of the delivered gravel. The 'bump' isn't obvious from here and there is quite a bit of gravel on top of the pretty white road gravel the County used to repair the road. |
 |
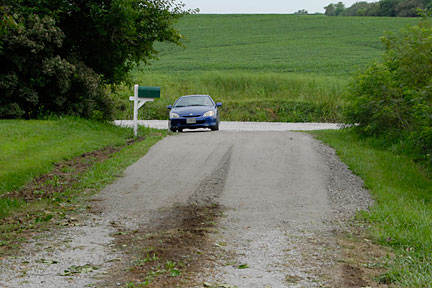
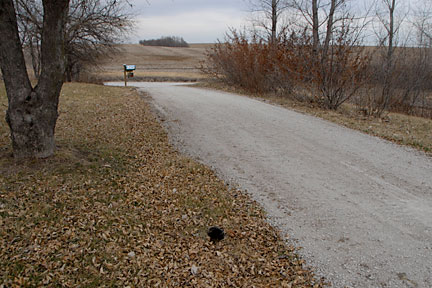
This image is from the mailbox looking toward the house.
You can see on the left side of this image that the gravel makes a good size slope in the grass next to the bushes. Originally there was no slope at all and after the gravel, I was no longer able to mow on that side of the driveway because of the slope. |
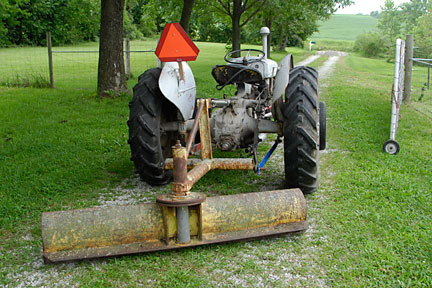 |
Here you see the tractor with the blade attachment all ready for the hubby to spread the gravel over the width of the driveway.
Unfortunately, we ended up having to ask a neighbor who does 'flat work' to do that for us.
I had hoped he would reduce the 'bump', but he didn't and that has been an annoyance for me ever since. |
 |
This last image is of the hubby using the Honda Insight to compress the now distributed gravel. The narrow wheelbase was handy to be sure the entire area got covered without having to drive in the grass on either side.
From this image, you can better see the slope on the right side by the bushes.
|
|
Driveway Grading (January 2023)
I thought the driveway 'bump' issue was just something I had to deal with mentally. Then we hired Robby Hotmer in 2018 to do the french drains around the garage and when, in 2019, he helped us out with the driveway gravel in the west pasture, I knew he/his crew would be able to fix the driveway and I just had to find the money to get that done.
When we surprisingly had money left after our Scotland vacation, I earmarked some of it for the driveway. That 'bump' really bothered me!
Robby came out in the Fall of 2022 to see what we needed and we told him we weren't in a hurry this time so would he add us to his list and let us know when he was ready to do the job.
- The primary task was to regrade the main driveway from the road to the crab apple tree to get the grade correct.
- The circle drive has an outlet to the road that has always been bumpy, so we would appreciate it if they amended that and applied some of the gravel there.
- The area in front of the garage needed a top dressing over the 2" gravel left from the french drain installation.
- Any extra gravel to be applied around the circle itself.
|
 |
Tyler did the job this time. He was here in 2018 on the french drain job so I knew we were in good hands.
As you can see from this image at left, there was a great deal of gravel to move around.
He worked by 'shaving' the gravel off over multiple passes... no gouging into the driveway at all.
|
 |
This is after several passes and you can see where he has found the orginal gravel and scraped a bit of the dirt that has accumulated on top of that gravel.
You may not be able to see it, but I can already see the correction to where the 'bump' had been. |
 |
Another perspective of the area in the photo above, but this is just the part past the mailbox.
That brown strip in the center is accumulated soil/plants because our tires don't compress that area.
He has intentionally left a bit of a 'curb' on the right side next to the swale (where the drainage tube is) to support the goal of keeping running water off the driveway. |
 |
As you can see from this and the next image, he worked in both directions removing small amounts at a time. |
 |
As you can see from this and the last image, he worked in both directions removing small amounts at a time.
On the road beyond him is the pickup truck and trailer used to haul the bobcat. |
 |
After he finished correcting the grade of the main driveway, he used what he had accumulated in his bucket to top dress the portion between the crab apple and the road.
He had already taken several loads up to the garage and top dressed the parking area in front of doors. |
 |
Even though the images are divided up by area, that is not how he worked. He was very efficient with removing some gravel and taking to the garage area and then heading to the circle exit to do grading there.
I imagine that let him calculate how much of the gravel he needed to bring over to repair the problems he found there.
Here he is working on the grade of the upper portion of the circle exit. |
 |
He even scraped off that central accumulation of soil/plants to level off the top of that section of the driveway. |
 |
This image shows how very little gravel was originally used to make the circle exit. No wonder it was so bumpy.
I can see the 'steps', can you?
He smoothed that out (removing the soil/plants that had accumulated on the 'steps' in the process) and gave us a nice transition even if it is a steep one. We understand that because of the 'pond' that location needs a steep pitch. |
 |
Here you can see the fully corrected circle exit. Part of the problem with this area has always been due to the road crew cutting into the driveway when they grade the road.
That left a 'curb' along the road and a big hill on either side that makes mowing a headace for us and the County mowers.
Tyler accomplished removing that 'curb' and now the circle exit transitions to the road level in such a way that any road grading should not impact the driveway. |
 |
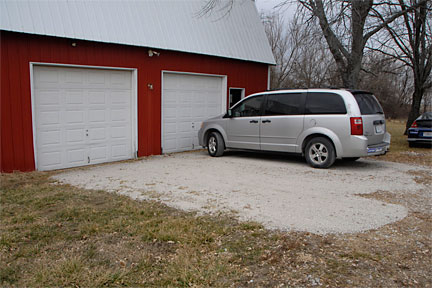
There was no grading needed at the garage. Instead Tyler was distributing the gravel over the area in front of the doors as a top dressing to the 2" gravel that had been needed for the french drains.
In this image he has already applied gravel to the nearer area and is working on the area in front of the further door. |
 |
After distributing the gravel, he used the bucket to smooth it as he backed up.
Then he picked up any extra gravel that had piled up. |
 |
That gravel was then distributed over the previous layer. |
 |
This is the result. You might be able to see some of the 2" gravel in the near ground at the bottom of the image.
We had hoped there would be enough gravel to top dress that entire area, but alas, there was not that much.
We have asked Robby to acquire enough 1/2" clean gravel to finish top dressing the parking area between the garage and the fence. That will be addressed at a later date. |
 |
Here is Tyler spreading some of the extra gravel around the circle drive. It really does not have enough depth to keep plants from growing through it and while it would have been nice to use that gravel to top dress the parking area by the garage, it was more important to use it where he put it. |
 |
This image is from the front porch of the house toward the road. You can clearly see the circle drive now.
After Tyler finished, I used the SmartCar to compress the gravel throughout the project. The VERY narrow wheelbase made it easier to cover the entire driveway side-to-side so that the center could be compressed as well as the usual tire tracks. Yes, the tires are very narrow and the SmartCar is (relatively speaking) pretty lightweight, but the pressure of the car on those little tires did a really nice job compressing the gravel.
I also enjoyed finding exactly where on my hood/windshield associated with the location of each tire track. By the time I finished I could pick up those narrow areas I had missed at the beginning very easily. (Yeah, I know, it doesn't take much to make me happy, LOL.) |
 |
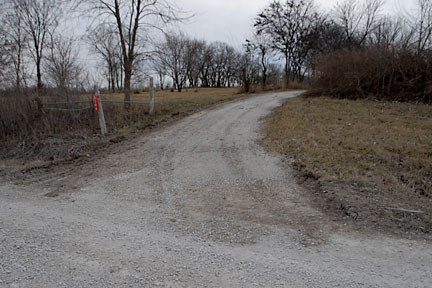
This is the circle exit from the top of the rise looking at the road: nice and smooth with a lovely topping of gravel where it needed it.
The dark gravel near the bottom of this image is just 'dirty', a nice rain with move that dirt. |
 |
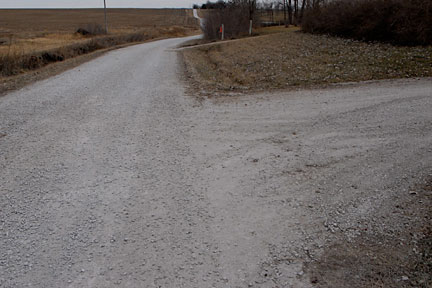
Here is a look at the transition between the circle exit and the road: nice and smooth.
I can see the old gravel in bands across the driveway and the new (smaller) gravel between them. But then I'm intimately aware of the nuances of this area from 'mowing' the driveway, LOL. |
 |
A different angle of the circle exit. |
 |
A close-up of the circle exit/road transition (from the main driveway).
You might also see the culvert for this driveway in the middle of the right side of the image below the gravel and some grass.
There is a small ditch created by the water running along the road through the culverts. |
 |
Here you see both driveway transitions to the road. You can also see the small ditch created between the culverts by running water. |
 |
The now finished main driveway looking from between the driveways.
You can see the culvert in the bottom center of this image.
We will no longer get stuck at (or before) the mailbox because of snow and the wrong pitch to the driveway. (Ice is a different subject, LOL.) |
 |
The main driveway from the other direction. The culvert is in the lower right segment of the picture but not really seeable.
Most of the time, we pull out of either driveway and head west (up the hill). Conversely, mostly we approach the property from the west (down hill) and are turning right into the driveway.
Therefore, the pitch east-to-west of the driveway makes that turn easier (a bit higher on the outside of the turn and lower on the inside of the turn -- if I'm being clear, I hope so). |
 |
Other than that turning pitch at the road, the entire driveway is rounded (ever so slightly higher in the middle than on the edges) to shed water to either side and now there is a 'curb' along the west (right in this image) side by the swale to encourage runoff to stay in the grass.
These next few images show off the new driveway and I think it deserves to be shown off! |
 |
These images show off the new driveway and I think it deserves to be shown off! |
 |
These images show off the new driveway and I think it deserves to be shown off!
You can see the culvert by the apply tree in the bottom center of this image. That water is directed to the rain-garden pond between the arms of the circle drive. |
 |
And here is the top dressed area in front of the garage after I compressed the gravel with the Smart Car.
The hubby recently told me that he too did some driving around the new gravel in the Van. I guess he wanted to share in the fun, LOL. |
Soffit Repair (Winter 2024)
We had fascia/soffit repairs done in 2020 by the company that installed our TPO roof. Sadly, they did not do as good a job as we had hoped in several places. And the hubby has been tackling the repairs that have already become problems in less than four (4) years. |
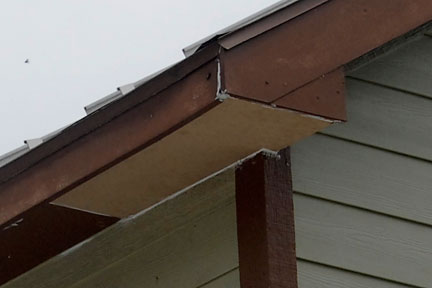 |
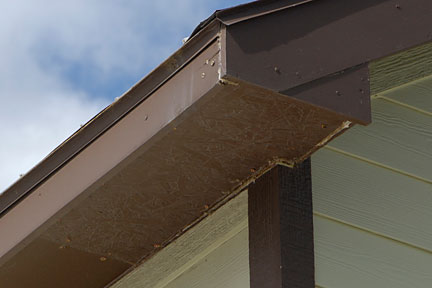
The image at left shows the repair job done in 2020 at this location (southwest corner of the east gable).
The crew replaced the damaged soffit with MSB instead of plywood. It looks fine, but there are no nails or screws securing it in place. They used what appears to be a wood glue and/or caulk to keep in in place. |
 |
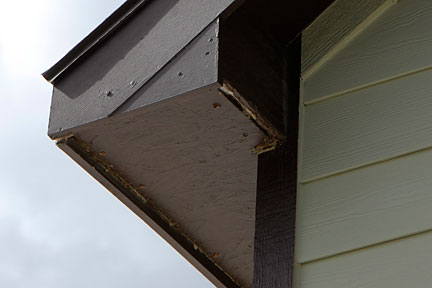
The next image at left shows the same location in the summer of 2024.
The MSB has warped and the glue/caulk has pulled away at the southern area.
In this image you can just about see one wasp walking to or from the opening along the east side of that board.
I had noticed this problem in the previous year but we had not been able to address it at that time. There were often blue hornets and paperwasps buzzing in and out in large numbers.
Nice for the insects, not so nice for us humans. |
 |
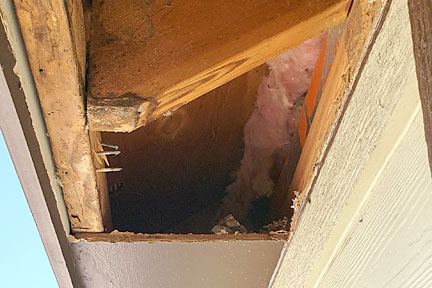
These next images are what the hubby found when he removed that MSB board after we waited until all the wasps had left for the winter.
The first image is the overall area and it proves that no mechanical fasteners (nails/screws) were used to secure that board in place. |
 |
This second image shows the water damage along the east edge... the part that extends beyond the wall. This comes from water traveling down the vertical east board to the board that had abutted it. (No drip edge provided.)
You can also see the wasp nests; both paperwasps and mud daubers in the images below left and right.
In these same images, you can see how the Azek board fascias DO warp and shrink (even though they are advertised to do neither).
The nails that are visible are where the Azek fascias were attached to the structural roof boards. |
 |
 |
 |
The image at left shows the area at the north end of the replacement board.
It appears that the rest of the soffit is possibly not plywood but MSB like the repair crew used. I would hazard to guess that there is less water damage because the MSB isn't infiltrated due to the correct "drip edge" of the fascia board and the caulk and paint on the siding. |
 |
Once the hubby removed the board, he took measurements all over it so that he could create a replacement in plywood. He also measured the opening once all the debris/caulk/etc. was removed and made sure the measurements of the new board were correct.
We painted all the sides/edges of the replacement board to minimize water infiltration as much as possible. (No photos of that, sorry, but paint drying really is boring.)
The plywood board surface has texture unlike the MSB shown. It may not match the rest of the soffit perfectly, but I'd rather a stronger, functional material over matching the rest.
There was a great deal of prep required to putting the new board in place. Something the original crew should have done and we suspect all of their repairs DO NOT HAVE.
Firstly, after cutting away all the debris/caulk/etc. the hubby used screws to resecure the warped Azek fascia boards to the structural boards.
He then used scraps of 2x4 lumber to create attaching points... let's see if I can describe this since I don't have pictures.
- He measured the depth of the new board first.
- Using that measurement, he attached the scraps of 2x4 to the structural lumber so that once he was ready to attach the new soffit board, it would be flush with the rest of the soffit boards.
- These scraps are on the fascia side and he marked where they are below where the board would extend so he would be sure to screw into those scraps with the board in place.
After securing the board into place, the entire seam was silicone caulked. We happened to have transparent silicone caulk on hand, so you can't see the actual caulk in the photos of the finished repair (final three (3) images below).
You can see the heads of the screws. Hubby used decking screws. Along the wall, the heads are at an angle because they went into the structural lumber already in place. |
 |
 |
 |
| All that is left to do on this repair is paint it. Of course, paint and caulk can only do so much to keep the water out, but we do what we can with what we have. I would love to do a major design change to the rooflines so the house has a more "Craftsman" look to it. Heavy sigh. |
Garage Electric Panel Ground (May 2025)
I freely admit I don't understand much when it comes to electricity. So when the hubby came in from working in the garage and told me he was digging a trench for the ground wire, I was a bit confused.
It seems that in his updates to electrical things in the house, he was reminded that he needed to put in a dedicated ground wire on the electrical service panel in the garage. |

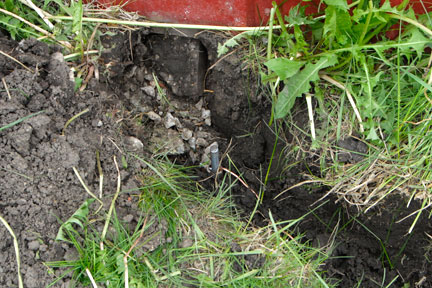
The image below is where the copper wire (you can just see it in the center near the top of the image under the red ag panel and between two (2) bricks -- put there to deter digging animals) leaves the garage and is attached to the metal post (center of image) before it goes north in the trench for about ten (10) feet).
|

The image above is where the new metal conduit tube goes under the gravel so it can enter the trench outside.
At left is the service panel all the way to where both the wire comes in under the ag panel wall (in the pvc conduit tubing) and the ground goes out (metal conduit tubing).
|

Above is the trench with the copper ground wire. Hubby used a tarp to contain the grass and soil during the procedure so it could be replaced easily and with no obvious signs of it ever having been disturbed. |
|
|